
Gitlab for Bachelor Students
Computer science students shall be proficient with a basic set of software development techniques.
-
Technical excellence is a mandatory skill for all software developers.
-
Agile development approaches are state of the industry and used in almost all software development initiatives.
-
DevOps approaches are used in modern organizations. They predate agile development approaches.
Technical schools should provide an in-depth experience in these areas to prepare their students for their future activities after completing their bachelor.
The below mind map consolidates concepts, tools, and approaches based on the GitLab tooling established in some universities. The approach emphasizes agile and DevOps concepts and approaches.
Italic terms identify concrete tools. Green font marks Gitlab features. Light blue background concepts map to technical university guidelines.
You should develop software applications using agile and DevOps techniques. You shall put your source code under a version management system. The actual industrial standard is git, a distributed version control system - DVCS -.
More sophisticated source code management systems based on Git with additional agile and DevOps functionalities are:
-
GitHub is a closed-source solution and the most well-known solution. Microsoft acquired them in 2020. Some Swiss technical universities - ZHAW, University of Bern - use the academic GitHub campus program. CI and CD pipelines are not part of the GitHub product and must be installed separately. The academic program means you receive GitHub licenses. Your organization is responsible for running the software on the premises.
-
GitLab is an open-source solution and a strong contender for GitHub. CI and CD pipelines are part of the product.
-
Bitbucket is a closed-source solution of Atlassian. CI and CD pipelines are part of the product. Atlassian also owns JIRA, Confluence, and Trello.
-
Azure Devops is a closed-source solution, and Microsoft answers to .NET development. CI and CD pipelines access is under definition by Microsoft. They slowly open their product to additional development stacks such as Java, Python.
-
Gitea is a community-managed lightweight code hosting solution written in Go. The project is hosed on GitHub. It is published under the MIT license.
-
Gogs is a painless self-hosted Git service. The project is hosed on GitHub.
-
Gitolite allows you to set up git hosting on a central server. It has fine-grained access control, and many more powerful features.
Schools often select GitLab due to his open source license and the tremendous DevOps functionality. The gitlab solution supports source code versioning, DevOps pipelines, agile development approaches, and quality insurance for the produced artifacts.
|
The technical university of Lucerne HSLU has selected GitLab platform as the standard DevOps environment. Well-known companies in Switzerland such as Roche Diagnostics, UBS[1], Siemens[2] have also standardized on this platform. Our students can more easily bridge between academical teachings and industrial practices and acquire a deeper understanding of DevOps and agile practices. Semester and bachelor theses are easier to realize through the use of known software development tool chains. Students can concentrate on the content of their thesis. |
Basic Git Knowledge for Students
Studying the history of software development practices shows the rise and fall of SCCS, CVS, ClearCase, Visual Source Safe, or Subversion. The current most popular and used tool is Git.
Any software developer or web designer can create a Git hosted project with a few commands in the shell.
|
Linux distributions often include the git application. If not use the package manager to download and install the Git tools. MacOS users should use homebrew as a package manager. Homebrew can download and install a huge set of Unix packages. To install git, you have to execute brew install git. The huge advantage of package managers is the update function to install new versions of your applications without any configuration activities. You are a Windows user you can find a Windows package on the git home page. |
Git has three different areas for your code:
- Working directory
-
The area that you will be doing all of your work in (creating, editing, deleting, and organizing files).
- Staging area
-
The area where you will list the changes that you have made to the working directory.
- Repository
-
Where Git permanently stores the changes you have made as different versions of the project.
git init (1)
git clone https://gitlab.enterpriselab.ch/tangly/tangly-os.git (2)

git add README.md (3)
git add * (4)

git commit -m "commit message, should be clear and legible" (5)
git push (6)
git pull (7)

git status (8)
git remote (9)
git --version (10)
| 1 | Create a new repository for the root folder of your project, the folder .git is created and contains all the git tracking information. |
| 2 | Clone the repository tangly-os and copy all files into the current folder. |
| 3 | Add the README file to git. |
| 4 | Add all files to git. |
| 5 | Commit files. |
| 6 | Push files to the remote repository you cloned in step 2. Your changes are now public and available to other developers. |
| 7 | Pull files from the remote repository you cloned in step 2. Your local repository contains the last public changes of other developers. |
| 8 | Returns status information about your local project. |
| 9 | Returns the list of remote repositories your project is connected to. Often you have just one remote to synchronize with. |
| 10 | Displays the version of your git installation. |
See our blog Git Local Repositories For the Impatient.
See our blog Git Branches for the Impatient for more advanced commands.
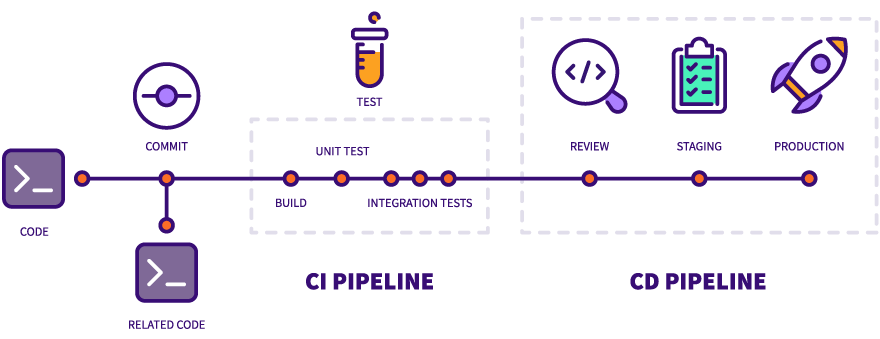
CI Pipelines for Students
The minimal Gradle build file of a Java project is elementary and compact.
apply plugin: 'java'Multi-module Gradle build file requires an additional gradle.settings file identifying your modules.
include 'net.tangly.bdd'
include 'net.tangly.bus'
include 'net.tangly.commons'
The initial build file for each module is the same as for a minimal Gradle project. You can now compile, test, and check your application.
gradle build (1)
gradle test (2)
gradle check (3)
gradle clean (4)
| 1 | Compile the simple or multi-module Java project. |
| 2 | Execute the unit tests of the project. |
| 3 | Perform static analysis checks if you define them. |
| 4 | Clean the output folders and delete all generated files. |
You are now ready to create a complete continuous integration pipeline of your project in gitlab. A complete .gitlab-ci.yml configuration for a Gradle project would be:
image: openjdk:15

variables:

before_script:
  - export GRADLE_USER_HOME=`pwd`/.grade

stages:
  - build
  - test

build:
  stage: build
  script: ./gradlew --build-cache assemble
  cache:
    key: "$CI_COMMIT_REF_NAME"
    policy: push
    paths:
      - build
      - .gradle

test:
  stage: test
  script: ./gradlew check
  cache:
    key: "$CI_COMMIT_REF_NAME"
    policy: pull
    paths:
      - build
      - .gradle
Java Development Environment
|
Please prefer a workstation powered with Linux or macOS if you are developing in Java, Groovy, or Python. You will be more efficient and avoid all the problems related to virus scanners, missing packages, or arcane path length problems. |
-
Install the latest LTS JDK and the latest JDK on your workstation.
-
Install IntelliJ IDEA IDE. Students can request a student license and work with the Ultimate edition. The community edition is free for everybody.
-
Use the static analysis function of the IntelliJ IDEA has a static analysis feature.
-
Select the file or package to inspect in the project view.
-
Click the right mouse button to display the context menu and select the menu item Analyze/Inspect Code…. The findings will teach you how to write better Java code and eliminate common errors.
-
-
Install Gradle to build your application
IntelliJ IDEA environment provides all the tools to work efficiently locally. All the tools identified in the above mindmap are supported in IDE and associated plugins. Students can work offline and learn the tools in a gentle manner.
The students can use the IDEA Static Code Analyzer without any additional configuration. The quality is good enough, and the feature empowers junior developers to learn modern and correct Java code.
More advanced scenarios use SpotBugs and the associated IDEA plugin.
How to Write Unit Tests for a Java Application
How to Document Your Project
Static code generators are becoming the standard approach for the technical documentation. One huge advantage is you can check the whole documentation into your git repository. You have a synchronization between a released version of your application and the corresponding documentation. Both are stored in the same repository and can be marked with a version label You can use:
Gitlab provides the Pages concept to create and publish complete documentation of a product.
Diagrams
PlantUML is a simple and powerful tool for diagramming. The tool is compatible with git philosophy and static website generators.
The IntelliJ AsciiDoc is used to write technical documentation and to display embedded PlantUML diagrams. AsciiDoc format has native support for PlantUML diagrams.
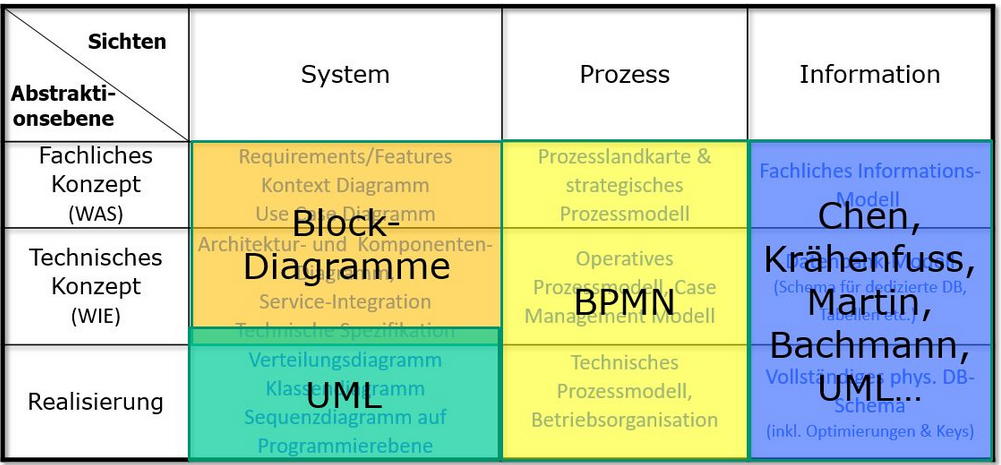
Students have training in technical notation such as UML, BPNM, C4, and others. They can now apply these notations to their projects using plantUML.
Agile and Scrum
Students have training in agile development and the Scrum framework. Gitlab allows them to apply these Agile Delivery Concepts to their semester and bachelor projects. Lecturers have access to the agile and Scrum artifacts and can qualify the quality of the work.
Advanced Git for Complex Team Development
Once you master the basic commands, consider learning advanced commands like:
Merge
Merge your branch my-branch back into the trunk
git commit –m "Some commit message" (1)
git checkout trunk (2)
$ git merge my-branch (3)| 1 | Develop some code and commit it in the currently selected my-branch. |
| 2 | Switched to branch trunk. |
| 3 | Merge the branch my-branch into the trunk. |
Rebase
Rebase trunk into your branch my-branch. Note that after a rebase, the commit ids of the rebased branch are new. A rebase is not simply a moving of commits around in history. Git actually creates brand-new commits with new commit ids and permanently deletes the old commits.
You should prefer to rebase only with local branches. Avoid rebasing shared branches. If you rebase a branch that was pulled from GitHub or GitLab and then push it back, the server will reject it.
git rebase my-branch trunkSquash
Git squash is a technique that helps you to take a series of commits and condense it to a few commits.
So let us see how to squash the last three commits to a single commit.
git rebase -i HEAD~3The following content will be shown:
pick 474bfdc2 3rd last commit
pick 1bffc15c 2nd last commit
pick 474bf0c2 last commit
For the commits that you want to squash, replace the pick instruction with fixup, so it becomes:
fixup 474bfdc2 3rd last commit
fixup 1bffc15c 2nd last commit
pick 474bf0c2 last commit
Cherry Picking
Cherry-picking in Git means choosing a commit from one branch and applying it onto another. This is in contrast with other ways, such as merge and rebase, which normally apply many commits onto another branch.
You can display the hashes of your commits in the trunk with the command:
git log --oneline trunkNow you can cherry-pick the commit you are interested in and apply it into your branch.
git checkout my-branch
git cherry-pick <commit-hash>
Local and Remote Branch
Read the post Git Branches for the Impatient.
Pull Request
Read the documentation of GitLab, BitBucket, or GitHub. You will use pull requests if you are working in a team for a project. Sadly, students rarely work in teams during their studies.